Visual Studio Code - Tasks II
In my previous post I introduced tasks in VSCode. In this post we’ll expand on the basic task and introduce a few more advanced concepts:
- Defining multiple tasks
- Creating dependent tasks
- Tasks requiring user input
At work we use Robot Framework for our acceptance testing. To run the tests you can call a command line executable and pass in various arguments.
robot -d results -v password:FOOBAR --suite tests/login user_login
Lets break this down:
- -d = results directory
- password = passing in a password (we don’t want to store this)
- –suite = what Robot suite we want to use
- user-login = the specific test we want to run
Remembering the arguments and format is a bit tedious so I decided to see if I could simplify the process with a task.
Some criteria:
- When running tests we generate output in the ‘results’ directory. It would be nice to clean this up each time we run a test.
- Need to prompt the user to input / select some things for each argument
- Some of these may be optional
Again the Visual Studio Code documentation on Tasks is very good. It took a bit of trial and error but soon I cobbled together the following:
{
	"version": "2.0.0",
	"tasks": [
		{
			"label": "Clean Results",
            "type": "shell",
            "command": "DEL /F /Q ${workspaceFolder}\\results\\*.*"
        },
		{
			"label": "Run Robot Tests",
			"dependsOn": "Clean Results",
			"type": "shell",
			"command": "robot",
			// quote each argument and flag
			"args": [
				"-d", "results"
				, "-v", "password:${input:Password}"
				, "--suite", "${input:Suite}"
				, "tests/${input:Test}"],
			"group": {
				"kind": "build",
				"isDefault": true
			}
		}
	],
	"presentation": {
        "echo": true,
        "reveal": "always",
        "focus": true,
        "panel": "shared"

    },
	"inputs":[
		{
			"id": "Password",
			"description": "Please enter a password",
			"default": "",
			"type": "promptString",
		},
		{
			"id": "Location",
			"description": "Select where to run test",
			"default": "TEST",
			"type": "pickString",
			"options": ["TEST", "DEV"]
		},
		{
			"id": "Test",
			"description": "Select test",
			"default": "login",
			"type": "pickString",
			"options": ["foo", "bar", "test", "general", "login"]
		},
		{
			"id": "Suite",
			"description": "Enter specific suite (optional)",
			"default": "login_tests",
			"type": "promptString"
		}
	],
}
The first thing to note is the ’labels’. These define multiple tasks. I created a task to clean up my test results (“Clean Results”) and a task to run the actual tasks (“Run Robot Tests).
Also note the “dependsOn” argument in “Run Robot Tests”. This ensure each time I run the tests the results directory will be cleaned up. I don’t have to manually run both tasks. “Run Robot Tests” is also flagged with “isDefault”: true ensure it will run by default.
The “presentation” section controls what is displayed and where. In this case I’m always going to display the output of the test in the terminal panel in VSCode.
Finally I define a series of “id"s for user input. These can be “promptString” where a user can enter text, or “pickString” where they can select from a pre-defined list of options. These ids are then used as variables in the “args” section of the actual task.
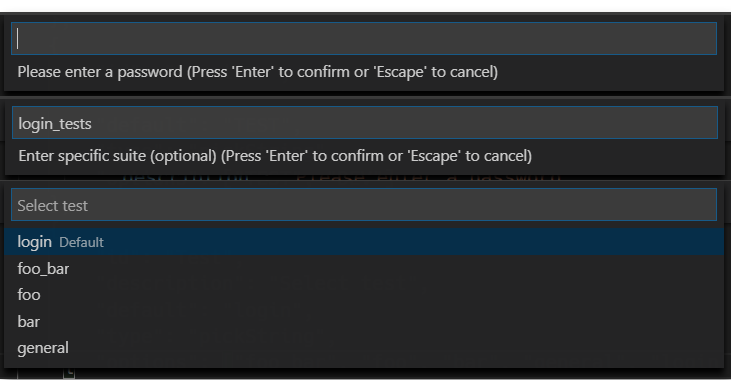
Now when I click CTRL+SHIFT+B my build task will run.
I’m presented with a password dialog, an optional suite and a list of tests to run.
The task will then start the test which will run in the terminal where you can monitor the status.